How to Enable and Use Sticker Maker Pro: A Complete Guide
- Customer Order Your Product: Customer order for Single Sticker / Sticker Sheet through the store.
- Customer Upload Designs: Customers then upload sticker images and clicks generate gang sheet buttons to create sticker sheets.
- Open your Shopify store and launch the Kixxl app.
- Here, you don’t need any pricing plan for Sticker Maker Pro. It’s completely pay-as-you-go, charging 5% of the order value ($1.50–$10 per line item, capped at $25 per order). Also, it has no monthly pricing plans or hidden costs.
- On Kixxl Dashboard, click on the Request Feature button to enable the Sticker Maker Pro feature.
- Fill in the required details: your name, email, and store name. (The Kixxl team will review your request and activate the feature for you.)
5. Once approved, you will see Sticker Sheet/Single Sticker listed in the Product type in Products section.
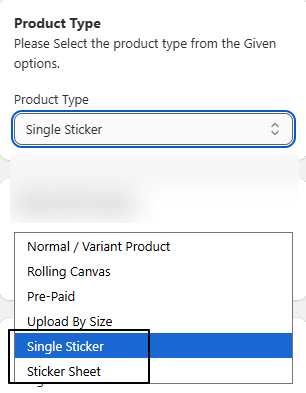
6. Now, configure your products for Single Sticker and Sticker Sheet.
7. To configure products, go to Kixxl Admin → Products → Configure Product.
👉 A step-by-step guide to configure a product for Sticker Maker/Sticker Sheet in Kixxl
After your products are configured, your customers can start placing orders for single stickers and sticker sheets.
- As a shop owner, you need to decide which product type you are offering to your customers: Single Sticker or Sticker Sheet.
(You can offer only one product type at a time.) - Customers then visit your store and order a product accordingly. They select their preferred size and quantity, then click the “Create a Sticker” button.
- The customer is then redirected to the Kixxl Builder (editor), where they can upload images and generate their sticker.
- In case of:
Sticker Sheet: the customer can upload all files at once in the editor if there are multiple designs. Kixxl automatically loads each design individually and prepares them for editing.
Single Sticker: the customer can upload only one image/design at a time.
Customer Customizes Sticker Inside the Builder
(For customers, using the Kixxl Builder to adjust their sticker or sticker sheet is optional.)
- Customers upload the sticker design into the builder.
- Adjusts the height, width, size, quantity, and shape of the sticker.
- Fine-tunes the cutline offset and cutline smoothness.
- Choose a background color for the sticker.
- Select the lamination type.
👉 Click here to explore all the advanced tools Kixxl’s builder offers for designing and arranging the stickers.
- Once all adjustments are complete, the customer adds the order sheet to the cart for checkout.
- You receive their order in your store dashboard (Shopify → Orders).
Download the Generated Sticker Images with embedded cutlines
You can now download a single, ready-to-print file where the cutline is already embedded inside the image.
This ensures:
- Printers/cutters can automatically detect the cut path
- No need to manually add or upload cutlines.
To download the file:
- Go to Kixxl, open Orders → Stickers
- Click the order to view the order details.
- Click the Download button to download the sheet for printing.