
Kixxl: Installation Guide for WordPress
Pre-requisites:
Before you begin with installation, make sure you have:
 A WordPress site with admin access
WooCommerce installed
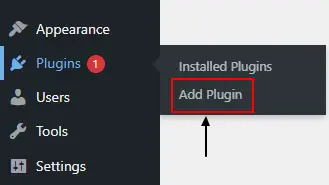
Navigate to the left side bar of your WooCommerce store and click Plugins → Add Plugin.
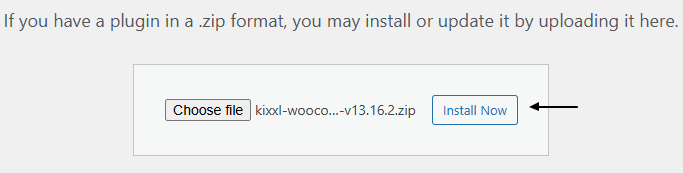
Navigate to the top right and click Upload Plugin.

Add the Zipped file of Kixxl and click Install Now.
After installation, click Activate Plugin.

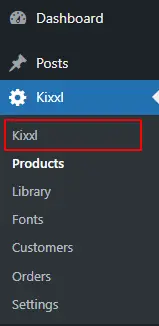
Now, you can view Kixxl on the left side menu bar of your WP store. Click on it to get started.
 You’ve successfully installed Kixxl to your WordPress store. You can now choose a pricing plan to begin with product creation.
Choose and Buy the pricing plan that suits your needs. However, consider the below mentioned detail:
Free Plan Vs. Other Pricing Plans:
- Free Plan: (not entirely free) This plan operates on a credit-based system. You pay for the credits you need, and you can use Kixxl for as long as those credits last. Once your credits run out, you can simply visit the plan page and purchase more credits at any time.
Additionally, you don’t have to wait until your credits are fully exhausted before topping up, you can add more credits to your account whenever you like.
👉 How to Add Credits for Free Plan?
- Other Plans:
All other pricing plans work exactly as described. The features and services listed under each plan are available strictly as per their mentioned price, no hidden changes.
![]()
👉 Check Kixxl Pricing Plans
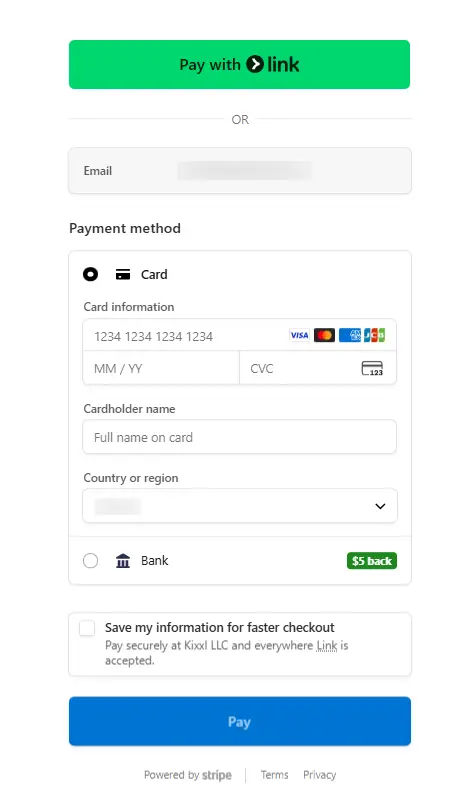
Select the payment method: Pay with Stripe Link OR Bank/ Card.
Enter your required details and continue with payment.
Once your payment is approved, you can see Kixxl on the left side bar. Click on it to start configuring your products.
First, you need to create or add products in your WooCommerce store. Once the products are added, you can configure them further inside Kixxl.
Adding Products in WooCommerce:
- Log in to your WordPress Dashboard.
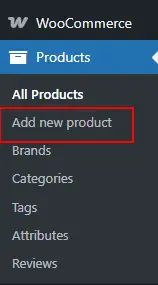
- From the left menu, go to Products → Add New Product.

Enter the following details:
- Product Name
- Product Images
- Product Description
Scroll down to the Product Data section:
Select Product Type (select Simple Product unless you want variations)
Enter Regular Price & Sale Price
Enter Tax Status & Tax Class
If you have product variations (sizes, designs, colors):
- Change Product Type to Variable Product.
- Create Attributes (e.g. Size, Color).
- Mark “Used for Variations” and “Visible on the product page” and click Save Attributes.
- Generate and enter price for the variations.
- Enter Product’s inventory & Shipping details.
- Add:
Product Image
Product Gallery (optional)
Category and Tags (optional)
- Once done, click Publish.
As products are now created in WooCommerce store, you can now configure them inside Kixxl.
1. Open Kixxl in Your WordPress Dashboard
- Log in to your WordPress admin panel.
- On the left side menu, click Kixxl.
- This will open the Kixxl interface connected to your WordPress store.
2. Go to the Products Section in Kixxl
- Inside Kixxl, navigate to Products.
- Click the Configure Product button.
- Search and select the product.


3. Add details to Product Configuration Settings
Choose the Product type (it will decide how you want this product to work inside Kixxl) such as:
- Image Upload by size
- Normal/variant product
- Single Sticker/Sticker Sheet
- Rolling Canvas
👉 Use this step-by-step guide to configure each product inside Kixxl Admin.


