Products Type & Customization
This guide walks you through the step-by-step process of configuring the Normal/Variant product type in Kixxl, ensuring it functions correctly within the Kixxl Builder.
To Configure Normal / Variant Product type in Kixxl:
- Ensure your login and the Kixxl Installation to your Shopify store.
1. Access the Product
- Go to Kixxl and select Products from the menu-bar on left side. (The Products tab allows you to view all items already configured in your store)
- Click “configure product” button on the top right corner of the product page.
2. Configure the Product
- Choose a product/item by typing the product title so that customers can see create a Gang Sheet Button on that Product on Shopify store.
- Select the Product Type from the given options to set the product version: Normal / Variant. (your choice can adjust how the builder behaves and what options you see)
3. Provide size for the variants
- The Variants section lets you define the print size for each product variant (such as different sizes or options available in your Shopify product).
- Also, select an option how your variants are grouped (e.g., Size, material or none).
- Enter the desired Width and Height for the product and its variants.
4. Adjust Name and Number (N&N) Setting
- The Name & Number (N&N) setting allows your customers to add custom names, numbers, or both directly to their gang sheets. This is ideal for creating personalized sports jerseys, team uniforms, event apparel, and other custom-printed products.
To enable Name and Number (N&N) Setting as Admin:
The Name & Number setting is disabled by default. You must enable it under Product Configuration Settings before your customers can use it. (This settings is available on All Kixxl pricing plans).
- Under N&N Setting, change the status to Enable.
- Add Name Size. (Name Size determines how tall or what height of the printed name will appear on the gang sheet. You can adjust width & height accordingly)
- There are a few default sizes (small, medium, large) to get you started. You can edit these sizes, remove them, or add as many new ones as you need. However, at least one size must always remain available.
- For example:
|
Name Sizes |
Name & Number size (inches) |
|
Small |
2 |
|
Medium |
4 |
|
Large |
6 |
5. Add Name Font. (The Name Font setting lets you choose the font style used for customer names on the gang sheet).
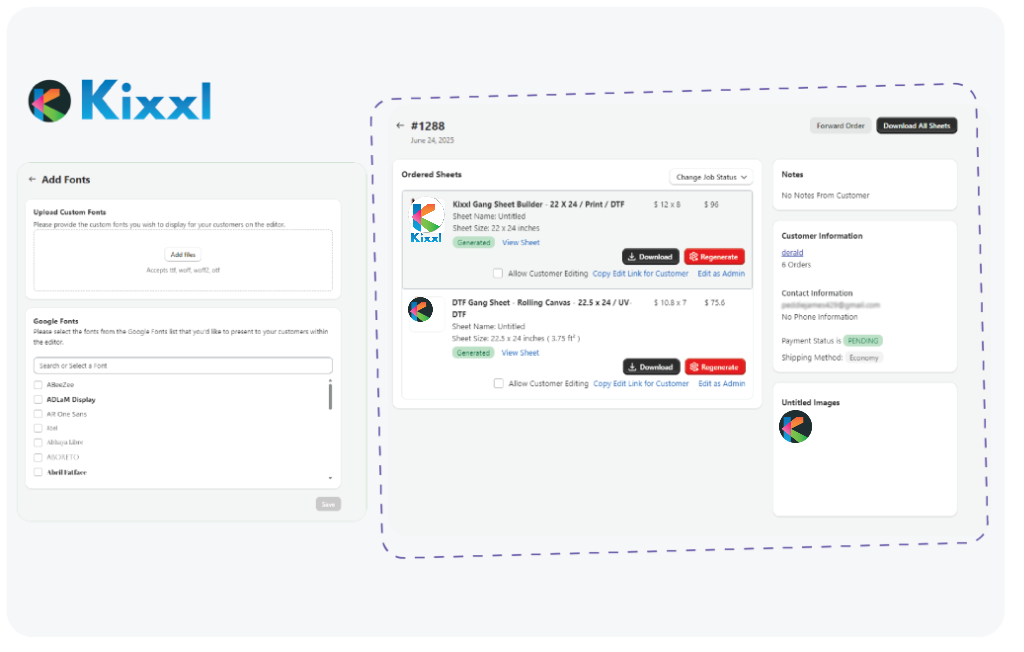
- Moreover, you can upload your own custom fonts or choose google fonts if needed.
How to Add Number Size:
- Add Number Size. (Number Size determines how tall the printed number will appear on the gang sheet. You can also add, edit, or remove number sizes based on your business requirements.
- Add Number Font. (The Number Font setting lets you choose the font style used for customer number on the gang sheet).
- Click the Save button.
Note: you can choose the number font same as the name font. However, If you don’t select any fonts, Kixxl will display font options you’ve already added in the fonts section.
How Customers Can Use the Name & Number (N&N) setting?
Once the Name & Number (N&N) setting is enabled, customers can:
- Visit the Kixxl store and open a product with the Name & Number (N&N) feature enabled.
- Click Create a Gang Sheet button to launch the Kixxl Builder.
- In the builder, click the Name & Number (N&N) setting.
- Under settings, you get three options: Name only, Number only, and BOTH.
- Select the desired font, size and color.
- Specify the required quantity.
- Select the Order (Name on Number OR Number on Name)
- Click Add to Canvas.
Kixxl will automatically arrange the entries on the gang sheet using AI Auto-Nesting, creating an optimized, print-ready layout.
5. Product Configuration Settings
Padding & Margin settings
- Margin (set the space between images on the gang sheet. Increasing the margin leaves more space between designs)
- Sheet Padding (set the empty space around the edges of the gang sheet. This prevents designs from being placed too close to the sheet border)
Show Mockup
- Enable/disable whether customers can preview their uploaded design on a product mockup before placing an order.
Automatically Adjust the DPI of Uploaded Images to 300
- When enabled, Kixxl automatically converts low-resolution images to 300 DPI for better print quality. Images with a DPI lower than 100 will be resized to 300 DPI, which may change their physical dimensions.
Resize Image
- Allow or prevent customers from resizing uploaded images in the Kixxl Builder.
Cut Optimized Nesting
- Choose Show/don’t show optimized cut lines after Kixxl automatically nests the designs on the gang sheet.
Automated Sheet Generation Menu on Start
- Show / hide the automatic sheet generation menu when the Kixxl Builder opens.
Auto Rotate
- Enable/disable the automatic image rotation during nesting to fit more designs on the gang sheet and reduce wasted space.
Free Move
- Enable/disable this setting for customers to freely move and position designs anywhere on the gang sheet.
Variants Selection on Autobuild
- Choose how product variants are selected when using the Auto Build feature. You can let AI select the best variant automatically or customer selected variant.
Sheet Details at the Bottom of the Sheet
- Enable/disable to print custom sheet information at the bottom of the generated gang sheet.
Sheet Details at the Top of the Sheet
- Enable/disable to print custom sheet information at the top of the generated gang sheet.
- Note: Any text entered for the sheet details will be printed on the final gang sheet.
Gang Sheet Downloaded File Name Format
- Customize the file name of downloaded gang sheets by selecting tags such as Order Number, Sheet Number, Sheet Quantity, Customer Name, Product Title, SKU, and more. Kixxl automatically generates the file name using the selected tags.
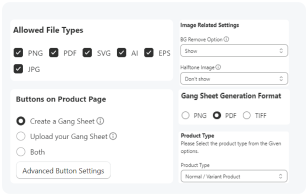
Allowed File Types
- Select the file formats that customers are allowed to upload in the Kixxl Builder. Only the selected file types will be accepted. Supported formats include:
- PNG
- JPG
- SVG
- AI
- EPS
Sheet Generation Settings (Gang Sheet Generation Format)
Choose the output format for the generated gang sheet.
Available formats:
- PNG
- TIFF
Trim Gang Sheet
- Choose whether Kixxl should automatically trim the generated gang sheet to remove any unused blank space around the designs.
DPI Warning Indicators
- Set the DPI thresholds used to identify image quality in the Kixxl Builder.
- Good: Images that meet or exceed this DPI value are marked as high quality.
- Fine: Images within this range are marked as acceptable but may not produce the best print quality.
- Bad: Images below this DPI value are flagged as low quality and may result in poor print results.
These indicators help customers identify image quality before placing an order.
Buttons on Product Page
Choose which action button appears on your product page.
- Create a Gang Sheet: Displays only the Create a Gang Sheet button.
- Upload Your Gang Sheet: Displays only the Upload Your Gang Sheet button.
- Both: Displays both buttons, allowing customers to choose either option.
- Use Advanced Button Settings to customize the appearance and behavior of these buttons.
Image Related Settings
- BG Remove Option: Show/ hide the Background Removal tool in the Kixxl Builder)
- Image BG Detection: Show/ hide the option that detects whether an uploaded image contains a background.
- Halftone Image: Show/ hide the halftone image option for customers during the editing process.
Semi-Transparent Pixels Detection
- Enable this feature to detect images that contain semi-transparent pixels. When enabled:
-
Kixxl scans uploaded images for semi-transparent pixels.
-
If detected, a warning is displayed to the customer before printing.
-
You can configure the minimum and maximum detection percentage to control when the warning appears.
This helps reduce unexpected print results caused by partially transparent artwork.
Library Image Tags Setting
- Use tags to control which library images are available in the Kixxl Builder.
-
No tags selected: All library images are displayed.
-
One or more tags selected: Only library images with the selected tags are shown.
This makes it easier to organize and display images for specific products or categories.
Save Your Settings
- Click Save to make sure all your changes are applied and live.
To Configure Rolling Canvas in Kixxl:
- Ensure Kixxl Installation and login to your Shopify store.
1. Access the Product
- Go to Kixxl and select Products from the menu-bar on left side. (The Products tab allows you to view all items already configured in your store)
- Click “configure product” button on the top right corner of the product page.
2. Configure the product
- Choose a product/item by typing the product title so that customers can see create a Gang Sheet Button on that Product on Shopify store.
- Select the Product Type from the given options to set the product version: Rolling Canvas (your choice can adjust how the builder behaves and what options you see)
3. Adjust canvas related settings and pricing
- This section lets you configure your rolling canvas dimensions and pricing rules for gang sheet orders.
- you need to provide the width and Length of your rolling canvas, along with the minimum order quantity (MOQ) and the pricing Per Square Inches.
-
Width (Min 1 – Max 50)
The fixed width of your rolling canvas, in inches. This stays constant since rolls only extend in length, not width. -
Rolling Canvas Length (Max 300)
The maximum length your canvas can extend to, in inches. This is your printer’s upper limit for a single gang sheet -
Starting Rolling Canvas Height
The default/minimum height the canvas opens at when a customer starts building their sheet, in inches. -
Minimum Order Quantity (MOQ)
The smallest area (in sq. inches) a customer must order. Protects against unprofitably small orders.
4. Enter Pricing
- Flat Rate: One consistent price per sq. inch, regardless of order size.
- Tiered-Based Pricing: Price per sq. inch changes based on quantity ordered (e.g., bulk discounts).
- Price: enter the rate charged you want to charge per square inch (in case of Flat Rate pricing)
5. Service Ad-ons
- Enable/ disbale service add-ons
6. Adjust Name and Number Setting
- The Name & Number (N&N) setting allows your customers to add custom names, numbers, or both directly to their gang sheets. This is ideal for creating personalized sports jerseys, team uniforms, event apparel, and other custom-printed products.
7. Product configuration settings
Padding & Margin settings
- Margin (set the space between images on the gang sheet. Increasing the margin leaves more space between designs)
- Sheet Padding (set the empty space around the edges of the gang sheet. This prevents designs from being placed too close to the sheet border)
Show Mockup
- Enable/disable whether customers can preview their uploaded design on a product mockup before placing an order.
Automatically Adjust the DPI of Uploaded Images to 300
- When enabled, Kixxl automatically converts low-resolution images to 300 DPI for better print quality. Images with a DPI lower than 100 will be resized to 300 DPI, which may change their physical dimensions.
Resize Image
- Allow or prevent customers from resizing uploaded images in the Kixxl Builder.
Cut Optimized Nesting
- Choose Show/don’t show optimized cut lines after Kixxl automatically nests the designs on the gang sheet.
Automated Sheet Generation Menu on Start
- Show / hide the automatic sheet generation menu when the Kixxl Builder opens.
Auto Rotate
- Enable/disable the automatic image rotation during nesting to fit more designs on the gang sheet and reduce wasted space.
Free Move
- Enable/disable for customers to freely move and position designs anywhere on the gang sheet.
Variants Selection on Autobuild
- Choose how product variants are selected when using the Auto Build feature. You can let AI select the best variant automatically or customer selected variant.
Sheet Details at the Bottom of the Sheet
- Enable/disable to print custom sheet information at the bottom of the generated gang sheet.
Sheet Details at the Top of the Sheet
- Enable/disable to print custom sheet information at the top of the generated gang sheet.
- Note: Any text entered for the sheet details will be printed on the final gang sheet.
Gang Sheet Downloaded File Name Format
- Customize the file name of downloaded gang sheets by selecting tags such as Order Number, Sheet Number, Sheet Quantity, Customer Name, Product Title, SKU, and more. Kixxl automatically generates the file name using the selected tags.
Allowed File Types
- Select the file formats that customers are allowed to upload in the Kixxl Builder. Only the selected file types will be accepted. Supported formats include:
- PNG
- JPG
- SVG
- AI
- EPS
Sheet Generation Settings (Gang Sheet Generation Format)
Choose the output format for the generated gang sheet.
Available formats:
- PNG
- TIFF
Trim Gang Sheet
- Choose whether Kixxl should automatically trim the generated gang sheet to remove any unused blank space around the designs.
DPI Warning Indicators
- Set the DPI thresholds used to identify image quality in the Kixxl Builder.
- Good: Images that meet or exceed this DPI value are marked as high quality.
- Fine: Images within this range are marked as acceptable but may not produce the best print quality.
- Bad: Images below this DPI value are flagged as low quality and may result in poor print results.
These indicators help customers identify image quality before placing an order.
Buttons on Product Page
Choose which action button appears on your product page.
- Create a Gang Sheet: Displays only the Create a Gang Sheet button.
- Upload Your Gang Sheet: Displays only the Upload Your Gang Sheet button.
- Both: Displays both buttons, allowing customers to choose either option.
- Use Advanced Button Settings to customize the appearance and behavior of these buttons.
Add Product’s Weight
- this is essential while selling a physical product as it helps in calculating the shipping cost accurately.
Image Related Settings
- BG Remove Option: Show/ hide the Background Removal tool in the Kixxl Builder)
- Image BG Detection: Show/ hide the option that detects whether an uploaded image contains a background.
- Halftone Image: Show/ hide the halftone image option for customers during the editing process.
Semi-Transparent Pixels Detection
- Enable this feature to detect images that contain semi-transparent pixels. When enabled:
-
Kixxl scans uploaded images for semi-transparent pixels.
-
If detected, a warning is displayed to the customer before printing.
-
You can configure the minimum and maximum detection percentage to control when the warning appears.
This helps reduce unexpected print results caused by partially transparent artwork.
Library Image Tags Setting
- Use tags to control which library images are available in the Kixxl Builder.
-
No tags selected: All library images are displayed.
-
One or more tags selected: Only library images with the selected tags are shown.
This makes it easier to organize and display images for specific products or categories.
Save Your Settings
- Click Save to make sure all your changes are applied and live.
To Configure Single Sticker or Sticker Sheet product:
- Ensure your login and the Kixxl Installation to your Shopify store.
1. Access the Product
- Choose a product/item by typing the product title so that customers can see create a Gang Sheet Button on that Product on Shopify store.
- Select the Product Type from the given options to set the product version: Single Sticker/ Sticker Sheet. (your choice can adjust how the builder behaves and what options you see)
2. Configure the Product
- Choose a product/item by typing the product title so that customers can see create a Gang Sheet Button on that Product on Shopify store.
- Select the Product Type from the given options to set the product version: Rolling Canvas (your choice can adjust how the builder behaves and what options you see)
3. Provide size of your variants
- The Variants section lets you define the print size for each product variant (such as different sizes or options available in your Shopify product).
- Also, select an option how your variants are grouped (e.g., Size, material or none).
- Enter the desired Width and Height for the product and its variants.
- Enter the Minimum and Maximum quantities along with their price.
4. Adjust other sticker related settings
these settings controls technical print and cutting settings specific to sticker products in Kixxl.
- DPI of uploaded images to 300
When enabled, automatically sets 300 DPI (dots per inch) on customer-uploaded images. It ensures sharp, print-ready quality and prevents blurry stickers from low-res uploads. - Cut Line Type
it determines how the sticker is cut from its backing:
- Kiss Cut: Cuts through the sticker only, leaving the backing sheet intact (peel-off style).
- (Other options may include Die Cut or Contour Cut, depending on dropdown selection.)
- Spot Color
The label identifies the cut line in the design file (e.g., “perfCutContour”). This name must match exactly what’s used in the artwork so the system recognizes where to cut.
- CMYK Color Input (Cyan, Magenta, Yellow, Black)
Define the exact CMYK value that would be assigned to the spot color/cut line. The cutting software identifies it correctly and it doesn’t get mistaken for a printable color. - Sticker Lamination
Disable/Enable to offer a laminate finish add-on for stickers. It adds durability and water/UV resistance.
5. Product Configuration Settings
Padding & Margin settings
- Margin (set the space between images on the gang sheet. Increasing the margin leaves more space between designs)
- Sheet Padding (set the empty space around the edges of the gang sheet. This prevents designs from being placed too close to the sheet border)
Show Mockup
- Enable/disable whether customers can preview their uploaded design on a product mockup before placing an order.
Automatically Adjust the DPI of Uploaded Images to 300
- When enabled, Kixxl automatically converts low-resolution images to 300 DPI for better print quality. Images with a DPI lower than 100 will be resized to 300 DPI, which may change their physical dimensions.
Resize Image
- Allow or prevent customers from resizing uploaded images in the Kixxl Builder
Automated Sheet Generation Menu on Start
- Show / hide the automatic sheet generation menu when the Kixxl Builder opens.
Free Move with mouse
- enable this option to freely move images on the sheet using mouse without restrictions.
Variants Selection on Autobuild
- Choose how product variants are selected when using the Auto Build feature. You can let AI select the best variant automatically or customer selected variant.
Gang Sheet Downloaded File Name Format
- Customize the file name of downloaded gang sheets by selecting tags such as Order Number, Sheet Number, Sheet Quantity, Customer Name, Product Title, SKU, and more. Kixxl automatically generates the file name using the selected tags.
Allowed File Types
- Select the file formats that customers are allowed to upload in the Kixxl Builder. Only the selected file types will be accepted. Supported formats include:
- PNG
- JPG
- SVG
- AI
- EPS
Sheet Generation Settings (Gang Sheet Generation Format)
- Choose the output format for the generated gang sheet.
Available formats:
Sticker cut-line settings
this settimg fine-tunes how the cut line is generated around sticker artwork.
- Cutline Offset (Min 1 – Max 60)
The gap (in points/units) between the edge of the artwork and the actual cut line — a small buffer so the cut doesn’t slice into the design. Higher values mean more white space/margin around the sticker. - Cutline Smoothness (Min 0.1 – Max 10)
Controls how smooth vs. sharp the cut line curves are around the artwork’s edges. Lower values follow the exact (possibly jagged) shape of the image closely; higher values round out corners and curves for a cleaner, smoother cut.
DPI Warning Indicators
- Set the DPI thresholds used to identify image quality in the Kixxl Builder.
- Good: Images that meet or exceed this DPI value are marked as high quality.
- Fine: Images within this range are marked as acceptable but may not produce the best print quality.
- Bad: Images below this DPI value are flagged as low quality and may result in poor print results.
These indicators help customers identify image quality before placing an order.
Buttons on Product Page
Choose which action button appears on your product page.
- Create a Gang Sheet: Displays only the Create a Gang Sheet button.
- Upload Your Gang Sheet: Displays only the Upload Your Gang Sheet button.
- Both: Displays both buttons, allowing customers to choose either option.
- Use Advanced Button Settings to customize the appearance and behavior of these buttons.
Image Related Settings
- BG Remove Option: Show/ hide the Background Removal tool in the Kixxl Builder)
- Image BG Detection: Show/ hide the option that detects whether an uploaded image contains a background.
- Halftone Image: Show/ hide the halftone image option for customers during the editing process.
Semi-Transparent Pixels Detection
- Enable this feature to detect images that contain semi-transparent pixels. When enabled:
-
Kixxl scans uploaded images for semi-transparent pixels.
-
If detected, a warning is displayed to the customer before printing.
-
You can configure the minimum and maximum detection percentage to control when the warning appears.
This helps reduce unexpected print results caused by partially transparent artwork.
Library Image Tags Setting
- Use tags to control which library images are available in the Kixxl Builder.
-
No tags selected: All library images are displayed.
-
One or more tags selected: Only library images with the selected tags are shown.
This makes it easier to organize and display images for specific products or categories.
Save Your Settings
- Click Save to make sure all your changes are applied and live.
👉 Troubleshooting
- Product type dropdown missing or disabled? → Reconnect Kixxl, clear cache, ensure proper store access.
- Images not resizing / DPI not applying? → Re-enable “Image Resizing” and ensure file type is supported.
- Button labels not applying? → Refresh admin, re-open product, confirm save.
If you still experience issues, Email us directly at support@kixxl.com